
This is hands-down the best gluten-free challah bread you will ever have ever had. And it’s super easy to whip up! It is soft and fluffy with a rich flavor that’s just slightly sweet. Another beauty of making gluten-free dough is that the dough is just such a dream to work with-you can braid your challah effortlessly, without having to worry about tearing or cracking!
I promised it to you for at least three years, and the moment has finally come: GLUTEN-FREE CHALLAH!!! I am so sorry to keep you all waiting, but trust me, it was 1000% worth it!!
This is really one of the most requested on the blog. Lately, I’ve been getting almost daily emails and messages asking for this recipe. I wanted to take some time perfecting and fine-tuning the recipe as much as possible-and I think we finally got it right. So, you get a pillowy soft and fluffy gluten-free challah bread which you can shape and braid with as much perfection as can be achieved from a traditional challah made of wheat flour.

Working with challah dough without gluten is a dream come true, as you can shape it into individual ropes or strands, braid them together without the fear of tearing or cracking.
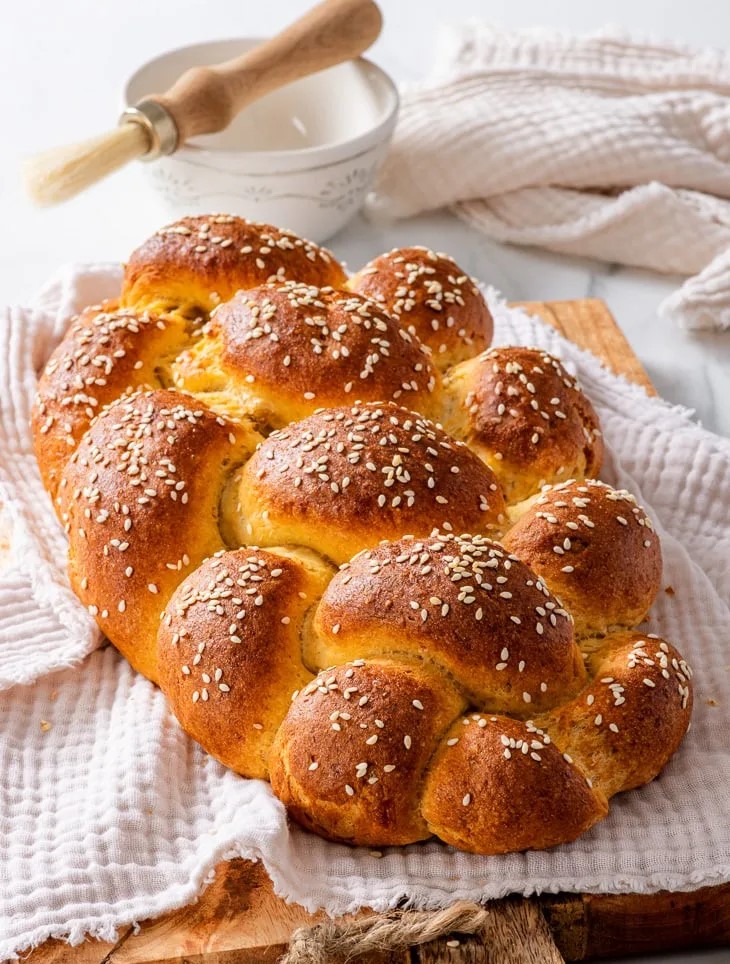
Feel free to play with the number of strands in your braid! You can do the simple three-strand braid or get fancy with the more complex five-strand braid. For me, I am always set for the four-strand braid- I have included a couple of pictures of it below.
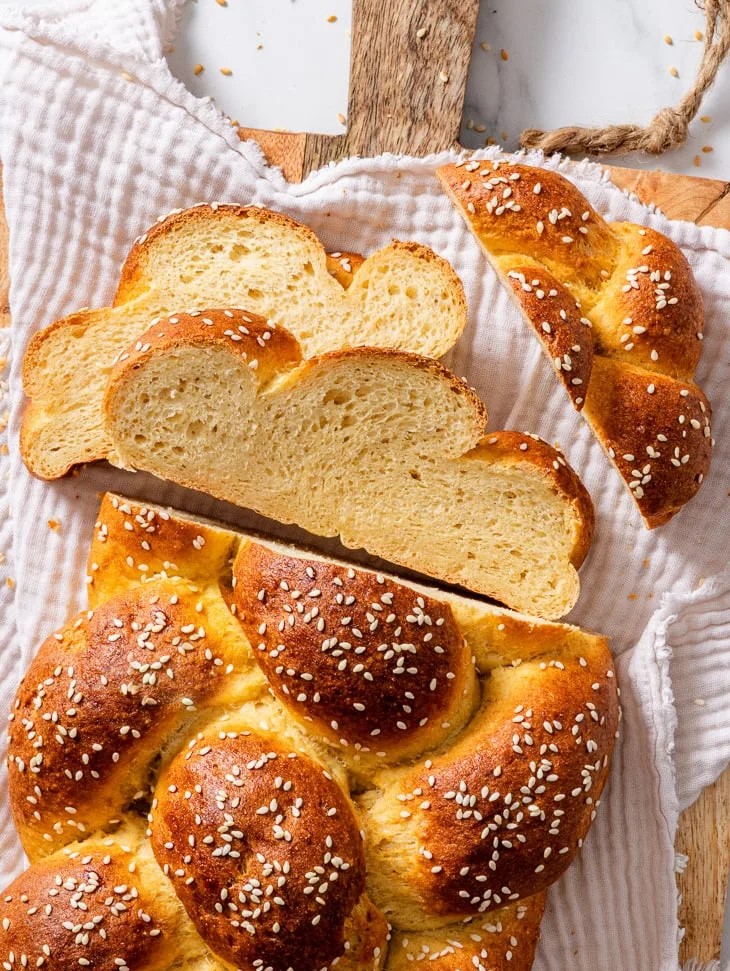
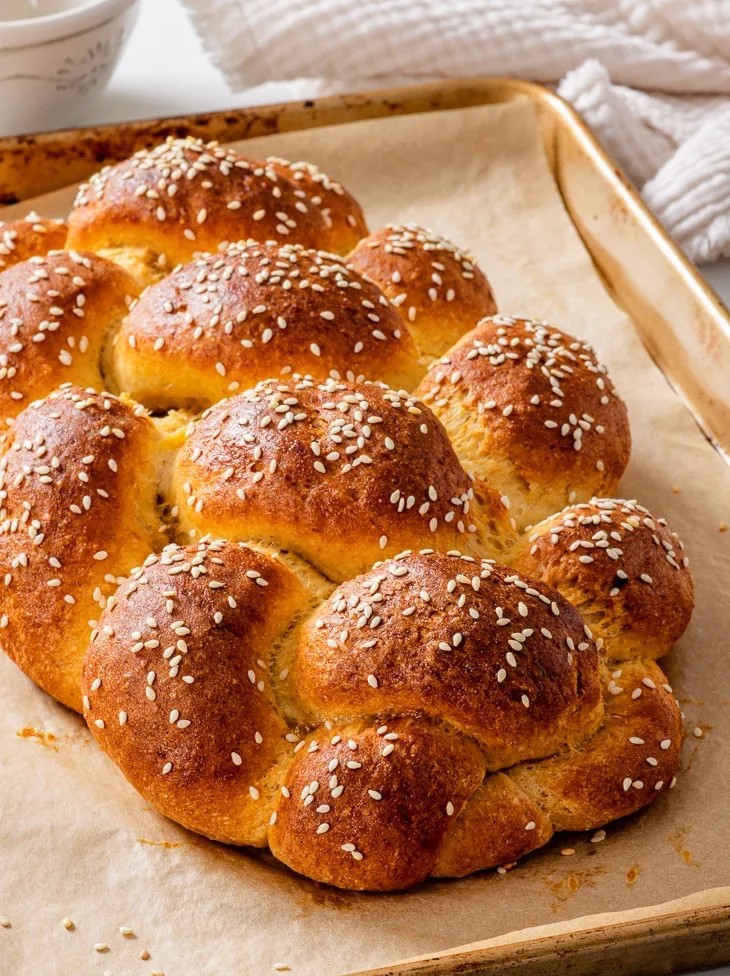
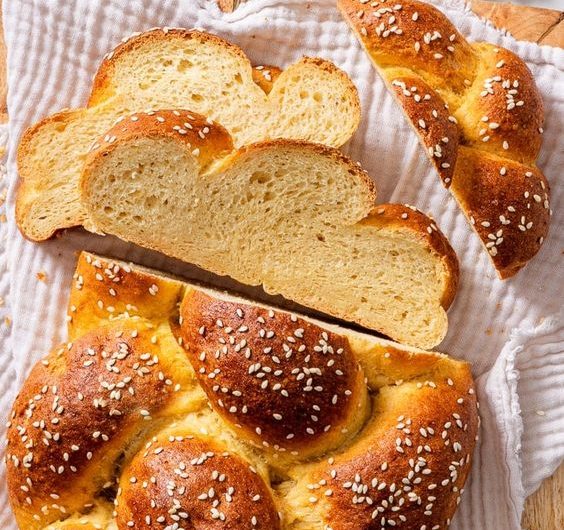
The gluten-free challah bakes to a gorgeous deep golden brown. This challah is downright lovely, richly bold in flavor with a soft, light texture and an inviting open crumb.
What is challah?
Challah is one of the richest breads consumed during the Sabbath and other holidays in Judaism. It’s actually braided dough, enriched to contain eggs, oil and sugar or honey. Therefore, it carries a sweet flavor and delightfully soft, fluffy texture. Unlike brioche, which includes milk and butter, challah is dairy-free, making it kosher.
For a deeper dive into what challah represents and the significance it holds in Jewish culture, take a peek at What Makes a Challah a Challah? by Andrew Janjigian and Rachel Mennies, as well as this informative blog post from Tori Avey on challah.
How to make THE BEST gluten free challah bread
This gluten-free challah is a breeze to whip up, and I’m here to guide you through every step of the process!
The ingredients
Psyllium husk: This ingredient is a gluten substitute, and you can work with this gluten-free dough to knead it and shape it into that famous challah braid, whether it’s in the three-strand, four-strand, or five-strand style. The psyllium husk gives the dough this elasticity and extensibility that causes it to expand when it is proofing and baking. Don’t even think about substituting something else for the psyllium husk! The recipe below makes use of whole psyllium husk, but if you are utilizing the powder type, you may directly use about 85% of the amount being called for. I suggest taking “blond” psyllium husk because the husks won’t tint your bread or affect its flavor.
Lukewarm water: This is the secret ingredient that makes a psyllium gel. Just mix the psyllium husk with the water until well combined. Give it about 30-45 seconds, and you’ll see it turn into a gel-like consistency.
Tapioca starch: This ingredient helps a lot in the texture of the dough. (If you’re looking for substitutions, check out the Substitutions section or refer to the recipe below.)
Millet flour: A great gluten-free option with lovely flavor and texture. (Substitutions can be found in the Substitutions section, or listed in the recipe below.)
Oat flour: Only a suggestion of nutty flavor and depth in this dough from the oat flour. (Substitutions can be found in the Substitutions section, or listed in the recipe below.)
Sugar: Use either caster/superfine sugar or granulated sugar for this recipe.
Instant yeast: While instant yeast does quite well, you can also use active dry yeast-but don’t forget to activate it. For further details, see the Substitutions page and the complete recipe below.
Baking powder: I always add baking powder to my recipes for gluten-free enriched bread, such as cinnamon rolls, dinner rolls, and doughnuts. In the case of gluten-free challah, it makes the texture fluffier and softer, even closer than that for traditional wheat flour-based breads.
Xanthan gum: I love using both psyllium husk and xanthan gum together as binders in my gluten-free enriched bread recipes. It gives you a soft plusher and more delicate crumb. However, if you use only psyllium husk then it generally tends to give you more chewy textures, suitable for white bread, artisan loaves, baguettes, etc.
Salt: Never underestimate the power of salt in any bread recipe! Salt enhances all flavors, and your bread tastes so deliciously better.
Eggs and egg yolks: This recipe called for one whole egg and two egg yolks. The combination gives the challah a rich flavor as it maintains a gluten-free dough that’s easy to handle and braid.
Sunflower oil: Feel free to replace it with another neutral-tasting oil such as canola, rapeseed, or vegetable oil.
Add-ins: Don’t forget to get one more egg for the egg wash, and if you’re fancy, sprinkle some sesame seeds on top before baking for that classic finish!
Why oat flour?
I often stick with tapioca starch, millet flour, and sorghum flour in most of my gluten-free bread recipes. Just this past week, though, a super cool follower on Instagram mentioned that for gluten-free challah to be kosher-cup under religious law-especially during Shabbos, when it is part of the traditional Jewish Sabbath meal and is blessed before dinner-it has to contain one of the following five grains: wheat, spelt, rye, barley, or oats.
Oat flour is therefore the only possible choice if you want to make your challah gluten free – that’s why I used a combination of tapioca starch, millet flour and oat flour for this recipe. However, if you’re sensitive to oats, you can replace the oat flour with an equal weight of sorghum, light buckwheat or white teff flour instead.
Making the gluten free challah dough
Gluten-free challah dough is one of those handful ingredients that really, really must be mixed by hand. That being said, I absolutely suggest using a stand mixer with a dough hook attachment to mix the gluten-free challah dough. Dough does tend to be on the stickier side, so the mixer really makes things a lot easier. You want to get your dough as smooth as you can so you have that great finish on your braided challah.
As you mix to completion, the dough should look a little bit sticky. Then do a quick knead on a lightly floured surface to handle it lightly, so it does not stick to your hands. Therefore, do not add any excess flour as it tends to result in a very dense and dry final product.
But if it’s too sticky to manage the dough, even with flour on your hands and work surface-do not be afraid to send it to the fridge for an hour. It will firm up the dough beautifully and make it much easier to handle.
Braiding the gluten free challah: the four-strand version
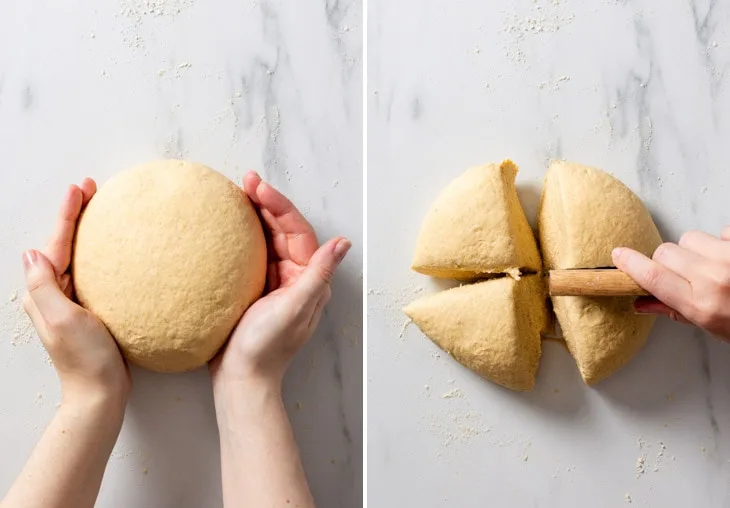
Now that you have mixed the dough, knead it lightly on a lightly floured surface and press it into a ball. Divide your dough into four equal parts- 250 grams each will be your piece.
Now, let’s work one section at a time, covering the other areas with plastic wrap or a clean dish towel to keep them from drying out.
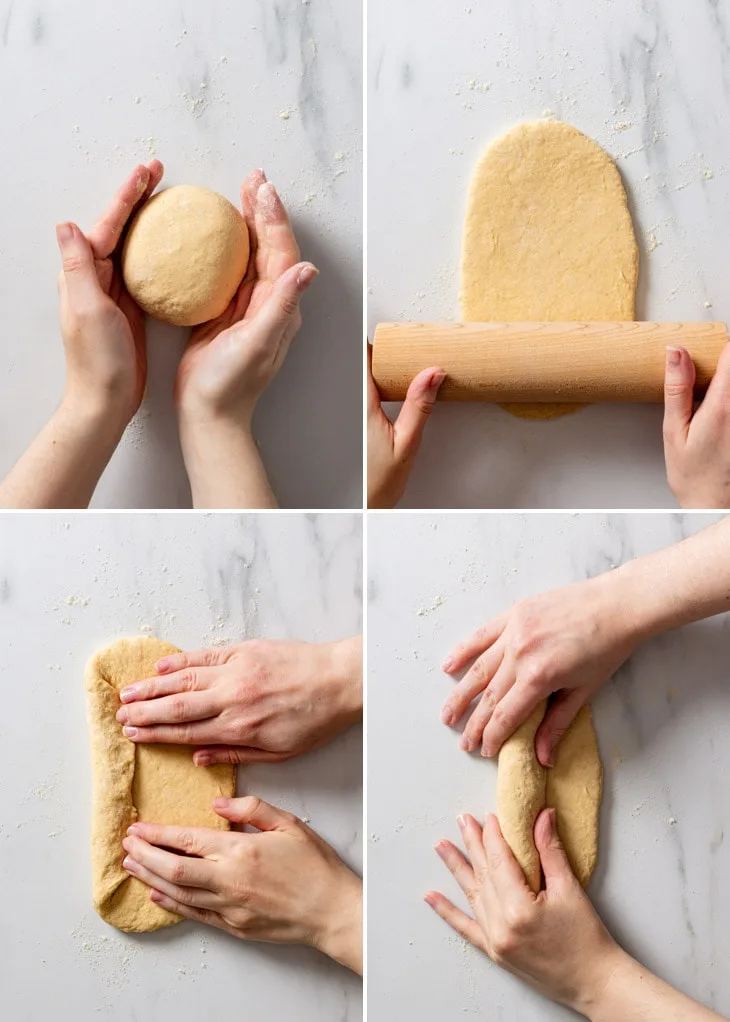
Take one of the pieces of dough and form it into a ball. Then, flatten the ball into a rough rectangle-don’t worry too much about its size; I always aim for about 8 inches by 5 inches (20 cm by 12 cm). Fold the dough over from the wider end, and press it gently to close. Fold and press it enough to roll it up into a log of about 8 inches long (20 cm). Be sure to pinch the seam together so that this side seals well.
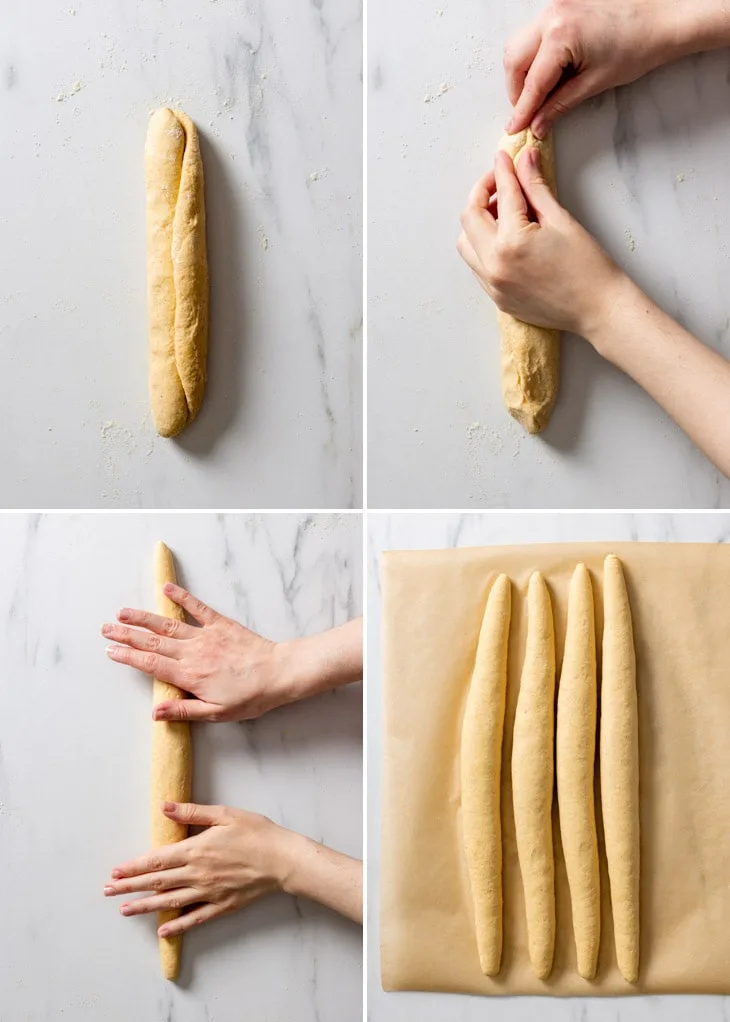
Pull the dough using the palms of the hands pushing and pulling the dough. On each piece when it reaches a length about 15 to 16 inches (38 to 40 cm), roll the rope at an angle, so that the ends of the rope are tapered little thinner in the center than the rope’s middle.
Do that for the remaining three portions, so you will have four ropes or strands, each about 15 to 16 inches long. Spread them out on a large sheet of parchment or baking paper. That way you can braid the challah right on the paper. Transferring the braids to the baking sheet will be much easier.
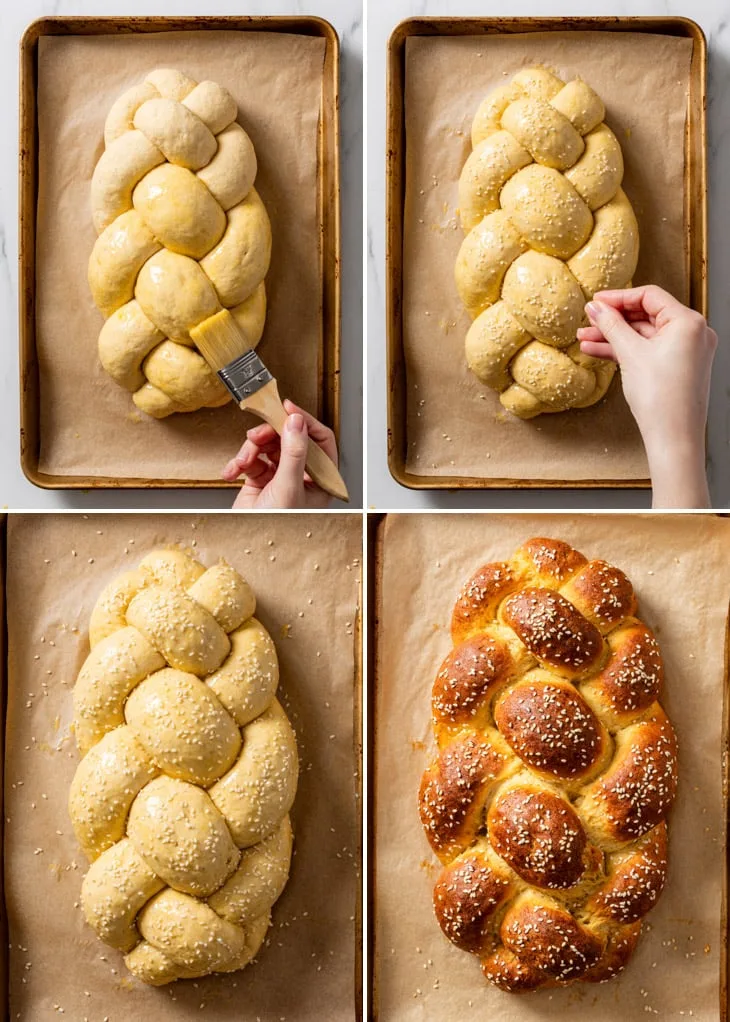
Braiding the challah I’m no expert on braiding, even though it’s October. I borrowed some cues from Jenn Segal of Once Upon a Chef, who has an awesome braiding guide that you can follow in the step-by-step photos below.
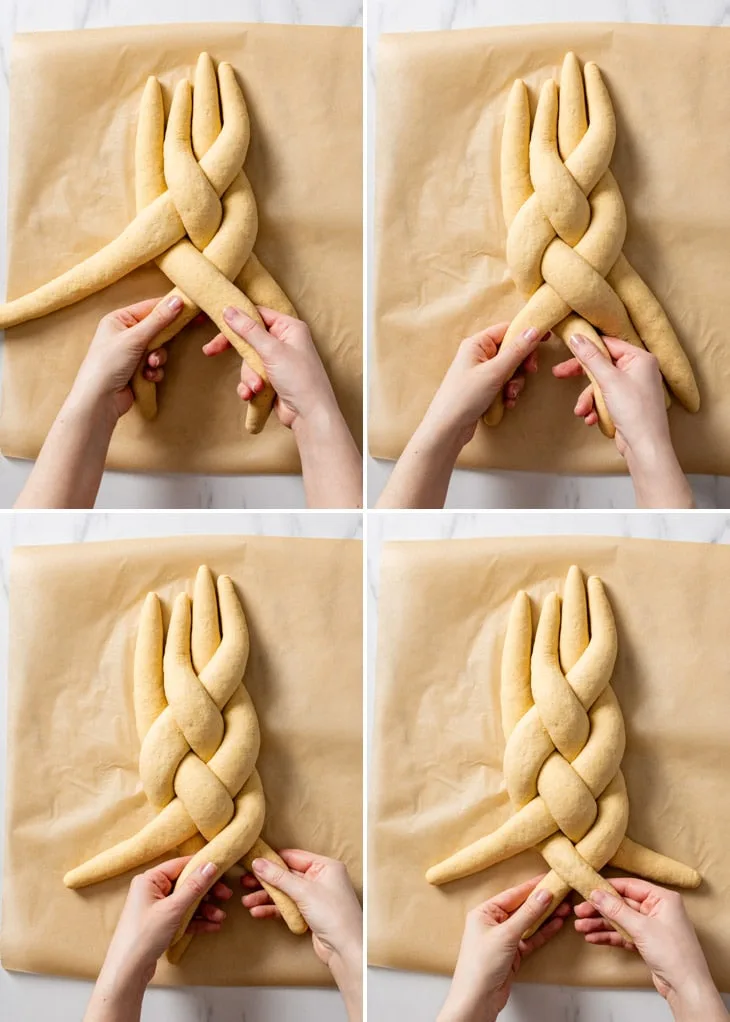
To summarize, you always begin with the far rope on the right and weave it to the left through the other strands, following an over-under-over pattern. Bear in mind that gluten-free dough is a bit more delicate than its wheat-based alternative, so be a little gentle with it.
I finish braiding the challah, working from the top third of the strands of dough down, and then flipping it into a 180-degree turn to finish the other end. That usually leaves one with the most attractive finish. But hey, braid your challah any way you like it and find easiest!
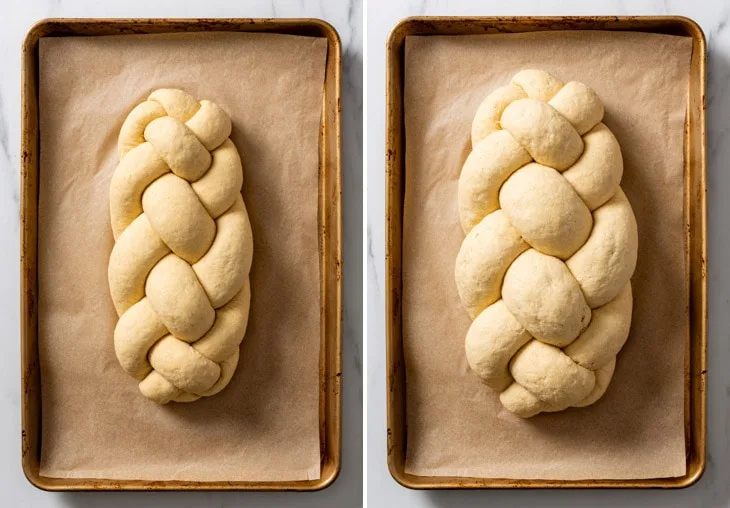
Neatly and smoothly tuck the ends under the braided loaf for a neater and more polished finish after you have braided.


Proofing
Transfer the challah to a large baking sheet by sliding it off the parchment or baking paper. Cut the paper as needed to transfer the challah onto the baking sheet.
Cover the challah loosely with a sheet of plastic wrap or cling film so that it doesn’t dry up and let it rise in a warm place till it doubles its size, which would take around 1 to 1.25 hours. In case your kitchen is quite cool, put a cup of boiling water in your off oven for an ideal warm and slightly damp proofing environment.
Egg wash & baking
Meanwhile, your dough is fermenting; so go ahead and put the oven rack to the lower middle part and preheat your oven to 375ºF (190ºC). Challah baked on the lower middle rack won’t burn too quickly on the bottom, so it will be perfectly done, as you wish.
Then, when your challah has doubled in size, brush it well with a whisked egg and pop off some sesame seeds if you fancy it.
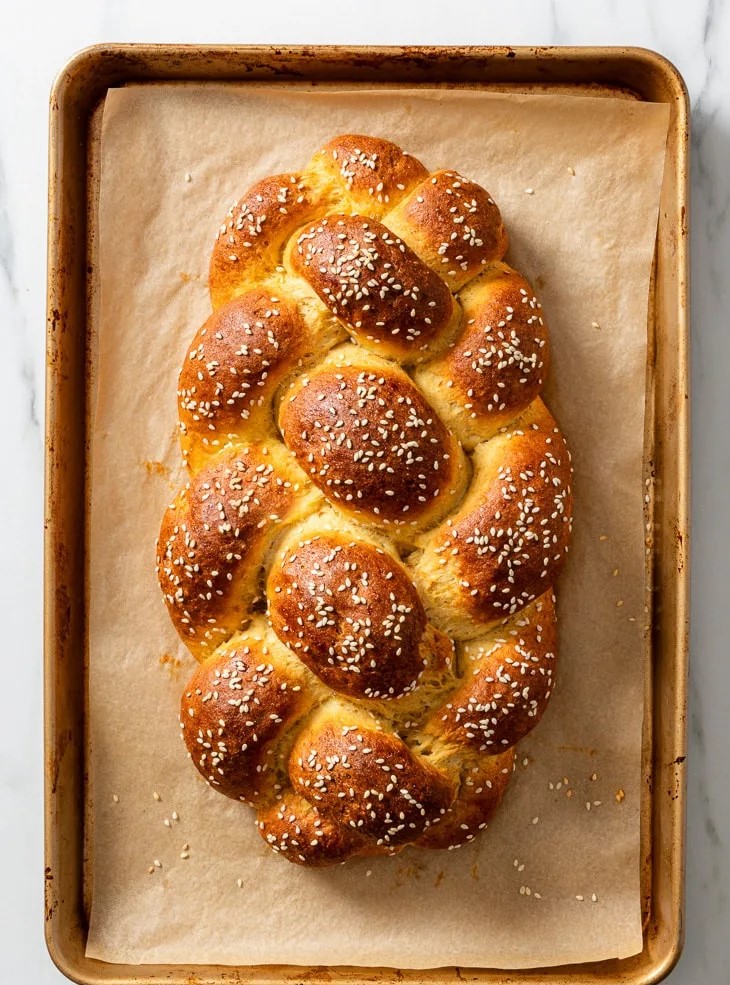
Then just place it in a preheated oven at 375ºF (190ºC) and bake for 28 to 30 minutes, or until it reaches a beautiful deep gold brown. To know when it’s done, you insert a toothpick as you would into a cake to its center. When a toothpick comes out covered with raw dough, you probably have given the challah a few more minutes in the oven.
Can I double the recipe to make two challah loaves at once?
Absolutely! If you have oven space for two loaves side by side on a baking sheet, you can easily double the recipe by multiplying each ingredient amount by two.
How long does this gluten free challah last?
This gluten-free challah is just so yummy when served fresh from day it was baked. However, if wrapped properly to prevent drying out and kept at room temperature, it could remain nice for 3-4 days. I suggest you toast or reheat it for the best flavor and texture on days 3 and 4.
Possible substitutions
Although most of the ingredients for this dish should be readily available at your local grocery store or online, I have compiled a list of substitutions in case you cannot locate an ingredient. Please note: All substitutions should be measured by weight, not by volume.
Instant yeast: If you have active dry yeast, use that. Just remember to activate it first. To activate it, just mix it in a small bowl with 1 tablespoon sugar and 120g (½ cup) of the water for this recipe; let this sit 5-10 minutes until it starts frothing and bubbling. Then you mix it into your dry ingredients along with the rest of your wet ingredients.
Psyllium husk: I do not have substitutes for psyllium husk, although if you are using psyllium husk powder, you can use 85% of the weight called for in a recipe.
Tapioca starch: It can be replaced with the same weight amount of cornstarch (US)/cornflour (UK), potato starch or arrowroot starch.
Millet flour: The same weight of finely ground brown rice flour can be used as a substitute instead of millet flour.
Use oat flour and substitute with sorghum flour or white teff flour or light buckwheat flour, at the same weight.
A note on measurements (tl;dr: if possible, use a scale)
I have included volume measurements (cups and spoons) in the recipe card below, but please do use metric gram measurements when possible. I wish I could stress this enough: they are far more accurate and lead to consistently delicious results. This principle applies to nearly all baking-using a kitchen scale will almost always yield better outcomes than relying on cups and tablespoons.
And that is it! Now you have all the information to create purely GLORIOUS gluten-free challah bread. Feel free to experiment with how many strands you put in your braid, more intricate braiding techniques, or a different topping such as poppy seeds.
Don’t be discouraged if your braids aren’t perfect right out of the box. Even if you’re an old hat at braiding traditional challah made with wheat flour, gluten-free dough is a slightly different animal.
Having baked hundreds of loaves of gluten-free challah, I still manage to find something to learn each now and then about the braiding technique. It’s all practice, people! But what matters is that if your braid looks a little goofy, well, that’s just part of its charm. And as far as the bottom line goes, it’s still the taste that really matters, and trust me, this bread delivers!
Gluten Free Challah Bread Recipe
Course: Baking, Cuisine, Easy Breakfast Recipes, Grilling, Recipe4
servings30
minutes40
minutes300
kcalThis is THE BEST gluten free challah bread you’ll ever try, and it’s super easy to make! It’s pillowy-soft and fluffy, with a deliciously rich, slightly sweet flavour. And the gluten free dough handles beautifully: you can easily braid your challah without having to worry about it tearing or cracking.
Ingredients
20 g (4 tbsp) whole/rough psyllium husk (If using psyllium husk powder, use only 17g.)
345 g (1¼ cups + 3 tbsp) lukewarm water
215 g (1¾ cups + 2 tbsp) tapioca starch (You can use an equal weight of cornstarch (US)/cornflour (UK), potato starch or arrowroot starch instead.)
135 g (1 cup) millet flour, plus extra for flouring the surface (You can use an equal weight of finely milled/ground brown rice flour instead.)
80 g (¾ cup + 2 tbsp) oat flour (You can use an equal weight of sorghum flour, light buckwheat flour or white teff flour instead.)
50 g (¼ cup) caster/superfine or granulated sugar
8 g (2½ tsp) instant yeast (If using active dry yeast, use 10g.)
8 g (2 tsp) baking powder
7 g (2½ tsp) xanthan gum
7 g (1¼ tsp) salt
1 US large/UK medium egg, room temperature
2 US large/UK medium egg yolks, room temperature
40 g (3 tbsp) sunflower oil, or other neutral-tasting oil of choice
- You’ll also need:
1 US large/UK medium egg, whisked, for egg wash
1-2 tbsp sesame seeds, for sprinkling the challah before baking (optional)
Instructions
- I recommend making the dough using a stand mixer fitted with the dough hook attachment, but you can also make it by hand.
- Make the psyllium gel: In a bowl, mix together the psyllium husk and lukewarm water. After about 30-45 seconds, a gel will form.
- In a large bowl or the bowl of a stand mixer (if using), whisk together the tapioca starch, millet flour, oat flour, sugar, instant yeast, baking powder, xanthan gum and salt.
Tip: If using active dry yeast instead, you need to activate it first. Mix it together with a tablespoon of the sugar and 120g (½ cup) of the water listed in the recipe (note that that means you’ll use less water to make the psyllium gel). Set aside for 5-10 minutes, or until the mixture starts frothing. Then, add it to the dry ingredients along with the rest of the wet ingredients. - Add the egg, two egg yolks and oil to the psyllium gel and mix well to combine.
- Make a well in the middle of the dry ingredients and add the psyllium gel-egg mixture.
- Knead the dough until smooth and all the ingredients are evenly incorporated, then knead for a further 4-5 minutes (if using a stand mixer) or 6-8 minutes (if kneading it by hand). Use a rubber spatula to occasionally scrape along the sides and bottom of the bowl to prevent any dry patches of unmixed flour.
Tip: This extra kneading time will make the dough EXTRA smooth, which is the key to a beautiful gluten free challah. - The final dough will be slightly sticky to the touch – that’s okay, you’ll be working on a lightly floured surface so it shouldn’t be a problem. Resist the temptation to add more flour to the dough, as that can make the final challah too dense and dry.
Tip: If you find the dough too sticky to easily handle (even on a floured surface and with floured hands), you can chill it in the fridge for about 1 hour before proceeding to the next step. This will make the dough firmer, less sticky, and therefore easier to handle. - Shaping & braiding:
- Turn out the dough onto a lightly floured surface and shape it into a ball, then divide it into four equal portions, each should weigh about 250g.
- Take one portion of the dough and shape it into a ball (keep the others covered with a sheet of plastic wrap/cling film or a clean dish towel to prevent them from drying out).
Roll it out into a rough rectangle – the exact dimensions don’t really matter, aim for a size of about 8×5 inches (20x12cm).
Working along the wider end, fold the dough over itself and press down gently to seal. Continue folding the dough over itself (and pressing down to seal), you’re essentially rolling it up into an approximately 8-inch (20cm) log. Pinch the seam together to seal it. - Use the palms of your hands to roll the dough back and forth until you reach a length of about 15-16 inches (38-40cm). While you’re rolling it, make sure that you also create a slightly tapered shape, with the ends of the rope/strand slightly narrower than the middle.
- Repeat with the other three portions of dough, until you get four 15-16-inch (38-40cm) ropes or strands. Transfer them to a large sheet of parchment/baking paper – you’ll braid the challah on the paper, it’ll make it easier to transfer it to the baking sheet.
- Braid the four-strand challah loaf. Always start with the strand farthest to the right and and weave it towards the left through the other strands using the pattern: over-under-over. Repeat this pattern, always starting with the strand farthest to the right, until you have a fully braided loaf.
Note that gluten free dough is a bit more fragile than regular dough made from wheat flour, so you do have to be a bit more gentle with it. I usually start braiding at the top third of the braid, braid towards the bottom, then rotate the challah by 180 degrees and finish off the other end – this tends to give me the prettiest end result. (See the blog post for detailed step-by-step photos of the braiding process.)
Once you’ve finished the braid, tuck the ends underneath the braided loaf for a more polished final look. - Proofing:
- Use the parchment/baking paper underneath to transfer the challah onto a large baking sheet (trim the paper as needed to make it fit the baking sheet).
- Lightly cover the challah with a sheet of plastic wrap/cling film (to prevent it from drying out) and proof in a warm spot until doubled in size, about 1 hour to 1 hour 15 minutes.
Tip: If your kitchen is on the cold side, put a cup of boiling hot water into your (turned-off) oven – that will create the perfect warm, slightly humid proofing environment. - Baking the challah:
- Adjust the oven rack to the lower middle position and preheat the oven to 375ºF (190ºC).
- Once the challah has doubled in size, brush it gently with the egg wash and sprinkle with sesame seeds (optional).
- Bake at 375ºF (190ºC) for 28-30 minutes until the crust is deep golden brown. If the loaf starts browning too much or too quickly, you can cover it with a sheet of aluminium foil, shiny side up.
I like to check the doneness by inserting a toothpick into the centre of the loaf, much like you would with a cake: if your toothpick comes out with raw dough on it, the challah needs a bit longer in the oven. - Immediately transfer the baked gluten free challah to a wire rack to cool – this prevents any condensation from forming underneath.
- Enjoy warm or cooled completely to room temperature.
Storage:
- This gluten free challah is definitely at its best fresh, on the day of baking, but it also keeps well for 3-4 days at room temperature in a closed container or well wrapped (to prevent it from drying out). I recommend toasting or reheating it on days 3 and 4.